Heart Of Cards

Thursday, March 15, 2012

Just married Card


With this card I took A4 card & folded it in half to get a A5 landscape blank card. I mounted gold mirri card to the base card, then mounted a light green paper on the gold card, with a thin border of white flowers. All this was then put onto the base card.

The oval flowers were decoupaged using silicon glue & mounted onto a oval gold mirri card. The sentiment was mounted onto round mirri card, to complete the card.
As I don't have any fancy things to cut the oval or round shapes, I used my crafting scissors & this has left staggered egdes around the shapes. I must invest in whatever item I need to cut fancy shapes without leaving staggered edges.

Wednesday, March 14, 2012

Decoupaged card

I forgot all about this decoupage set from Papermania that I received from a friend last year xmas. I decoupaged the card using silicon glue, added the frame with double foam pads then finished the card with adding glitter highlights to the xmas stocking & the leaves. What a fab card for any enchanted fan.

Monday, March 12, 2012

Wedding Invitation 4

With this card I embossed the base card with hearts. I then took Papermania Capsules collection & cut it into a circle. This was then layered onto a gold scalloped circle then a pink circle. All this was put onto the base card. To complete the card I added gems to each point where the scallopes meet. Should have put a bit of organza ribbon on it, but unfortunately I ran out. Non the less, it's still a simple yet elegant wedding invite I think.

Sunday, March 11, 2012

Wedding Invitation 3


I had some patterned wedding paper over from my last invitation I had made, so decided I was going to use it. I took a light purple card base measuring 24cmx16cm.  I folded 8cm on the left hand side of the card and put some ribbon around the centre.
I punched the edge of the patterned wedding paper on both sides and layered this down the left hand side over the ribbon. I glitter highlighted the rose and the punched egdes.
I then heat embossed the sentiment "Wedding Invitation" in gold and heat embossed the Wedding rings in gold.

Wedding Invite 2


A friend from school days saw my cards & requested I make her wedding invitations in lime green & pink. Quite unusual colors I think, so tonight I got down to making a practice card although I never used lime green.

I took some wedding patterned paper & embossed it with hearts through my bigshot. I punched the edges with a edge punch. This was then layered onto pink card, then green card and finally onto the base card. In the middle of the wedding papers I heat embossed "Wedding Invitation" in gold. To complete the card I added 2 gems on either side on the wording.

Saturday, March 10, 2012

Spring Fling Birthday Card

I am just loving these papers from Kate Knight spring fling....they are ever so pretty with the big flowers.
Don't ask me what I was planning on doing because I never had an idea at the time lol, but I created something from it.
Here, I layered the paper on gold mirri card & this was glued onto the card base. The front of the card left hand side I used gold mirri card & light pink paper. On top of that again is gold mirri card with light pink paper. I heat embossed some birthday cakes in gold, added some butterflies which were egded with fine glitter. The sentiment was heat embossed on light pink paper & this was layered onto a round gold mirri card.
 

Spring Fling Card

This is a card I made today. The papers are from Kate Knight Spring Fling. I layered the paper onto gold mirri card & put this on the card base. I then punched out some butterflies with a Martha Stewart punch & added ultra fine glitter around the edges. The sentiment was heat embossed onto the tag.

Tuesday, February 28, 2012

Storms Butterfly Card

It was the half term & my daughter was extremely bored one day, so I got her into making some craft items.
This butterfly was cut with my help from a template I had in my stash. I out-lined the butterfly wings & the rest was done by her.
Basically, she used my embossing pen then added ultra fine glitter to each piece of the butterfly. She then completed it by adding gems to the wings, body & feelers. Considering she is only 7 & she chose the colors herself, I'd say it's a job well accomplished :-)

Sunday, February 19, 2012

Wedding Congratulations Card


OK, it was 9.30pm tonight, I got a bee in my bonnet & decided to take a chance & make a card from a book I bought 6 months ago...Making cards for special occassions.
I loved this perticular card since the day I bought the book but have never tried to achieve anything like this...always thought it was beyond my capabilities, but with my OH being so positive in my work, he edged me on to make it.....bless him :-)

As I ran out of quite a bit of card stock & accessories, I had to adapt the color but still think the end result is fab....especially for me that does most things like cutting out fancy designs by hand .

I created a DL card from gold mirri card as I didn't have pearlescent card. I then laid a cream color card on my work top (the faithful dining table) hehe, took a dinner plate & made my measurements to cut the curve sides. I then punch out small hearts around the egdes of the card.
I cut 2 pieces of rose paper that came with the book & again spent many minutes getting the correct curve sides.These were mounted on the ends of a cream color card that wraps around the completed card. AGAIN, a nightmare for the measurements.
Some more rose paper was  printed to go on the side of the card base. To complete the outside of the card, I added light pink pearl gems & heart gems. I think it would have looked fab if I did them all in pink gems but .....I ran out :-(
For the inside of the card I printed a classic label & double mounted onto cream card then gold mirri card. The sentiment "Congratulations" was done the same way. To complete the card I added 5 strips of ribbon hanging from under the label. The completed card was then mounted onto the gold DL card & the front was tied close with ribbon.

Saturday, February 18, 2012

Round thank you butterfly card


Here I have taken a round pink card & heat embossed Thank You in gold. This was then layered onto round gold mirri card then layered onto a pink round base card. To complete the card I added a material flower then 3 different colored butterflies.

Oval Butterfly Card


Tonight I decided to make a different shaped card instead of the boring usual square card. I cut an oval pink card, edged it in dark pink ink & heat embossed best wishes in 2 combined colors.
This was then layered onto a brown/green colored paper from a sample book that came in Papercraft & Cardmaking magazine.
I then layered this onto an oval pink card base edged in dark pink ink.
To complete the card, I added a shiny material butterfly on the upper edges of the card & added 3 flower gems along the bottom.

Friday, February 17, 2012

Butterfly Challenge


Well, tonight was the first time ever I've tried heat embossing on vallum. I printed a best friend poem onto white paper then put this onto a dark pink butterfly holographic card. This was then put onto the base card. I measured the vellum, glued it on, stamp butterflies on it then heat-embossed...only to realize afterwards that somehow the vellum was shrinking & the base card was bending.

ROUND TWO: 
Started again except this time I decided to not put vellum on the card until after I had heat-embossed the butterflies & sentiment.
To complete the card I added a material butterfly with a gem in the middle and finished the corners with pink/purple ribbon.

Thursday, February 16, 2012

Easel Card


This was my very first easel card I ever made...about 2 years ago, maybe even longer. Don't remember who the image is from but I know I had it on a CD that got destroyed in the house fire :-(

At the time I never heard of glitter glue or ultra fine glitter so it does look a bit bland but hey it's not too bad for first attempt.

Storm's craft


My daughter Storm aged 7 pictured above, was given a huge box of crafty items for her birthday but never got around to doing anything with them since her birthday which was in September. Now that the school holidays are here, I told her very nicely that if she doesn't use them I'll give them to charity for some other little girl to use.
With that, last night she got a bee in her bonnet & got down to doing something. Without any help, she just followed the pictures on the box & made these 3 items.

 The purple one is a monkey, which she claims has a bent arm so that he can hold her daddys cigarettes :-)

The bird house is made from lolly sticks all glued on top of each other. The bird was made from pom-poms & tied at the top with some cotton to make him swing about.

The snowman is made from 2 pom-poms glued together with a felt hat & shiny pipe cleaner around his neck as a scarf.
Well done Storm....you do me proud my angel xxx

Tuesday, February 14, 2012


These 2 cards are Josephine Wall. They print off so lovely then I just added ultra-fine glitter to highlight them.
The top card I glittered the fur on her hood, her ear-ring, the icicles off her sleeve & the greenage.

The bottom card has alot more glitter to it, again highlighting the important parts. What wonderful cards these are.

Monday, February 13, 2012

 
This is the card I want to enter into this weeks CBN challenge...All about Love.

I printed a Forever Friends teddy, colored it in & cut it out. I added red glitter to the heart. This was mounted onto gold mirri card using sticky foam pads. I added ribbon down the side & put small red hearts punched out of red mirri card on the ribbon & gold mirri card. All of this was mounted on the base card. The sentiment that's embossed reads I LOVE YOU & was mounted onto the gold mirri card with sticky foam pads.

Sunday, February 12, 2012

Pink Fairy Card


Tonight I stamped a fairy onto a pink fairy paper & highlighted the fairy with pink glitter. This was then mounted onto pink fairy paper, which was mounted onto gold mirri card. A spotty ribbon was added down the side, with a flower gem, ribbon bow & a small gem on the ribbon. To complete the card I added a pink material butterfly, four pink gems on the corner of the fairy & a sentiment which reads 
*Just a note...*.
Really think my sister is going to go oooooooohhhh over this one :-)

Saturday, February 11, 2012

Shades of blue

OK, so I have a broken wrist but not being able to craft drove me NUTS lol. After alot of persuasion I eventually got my other half to cut & glue whilst I gave instructions...must say he did a very good job :-)

Here I made an easel card. I heat embossed the sentiment in gold onto a blue starry paper from Papermania. This was mounted onto blue holographic card then gold mirri card. The bottom was completed putting 2 blue gems in each corner.
The fairy I glitter highlighted then mounted it onto gold mirri card. This was then mounted onto the blue starry paper, blue holographic card then the gold card.
I completed the card with a material butterfly on either side of the fairy.

Sunday, February 5, 2012

Craft storage


Well, this is the cupboard I've been bragging about. Doing some shopping in summer we came across this cupboard at a second hand store. I think my husband must have got quite tired of me using the dining table but hey, you know a crafter...never tidy & still prefers alot of space :-). When my husband asked the kind lady how much the cupboard is, he nearly fainted with the price...£50 she answered. It was the quickest I have seen my husband put so much money in a strangers hand. It turned out that it's actually a sweing craft cupboard but with the small box removed it becomes a craft cupboard. He knows I've wanted one for years but they've just been too expensive. As you can see, the dining table still gets used :-)

Hope...my entry into CBN Pink & Blue Challenge


After going through my crafty stash tonight, I came across some of these stick ons that someone had given me a very long time ago. You know the usual story, put it in a bag/container & forget all about it. It seems to amaze me what I come across when I clear my craft cupboard. Oh yes, that reminds me...I must show you all the craft cupboard my generous husband bought for me at a second hand shop. But, for now...I'll get back to my card.

I layered the base card with blue smooth patterned paper that I had stamped some squiggly patterns on. I then took all the stick ons and glitter highlighted each piece with ultra fine glitter. The sentiment at the top I heat embossed & highlighted with ultra fine glitter. I think this is so unusual & the outcome is fantastic

Wednesday, January 25, 2012

Bookmark


Whilst i was feeling poorly with ear infection, I got quite bored as I'm not one to sleep & relax under the doctors orders. I glanced through all my CD's and decided to do a Josephine Wall bookmark for my daughter & best friend in South Africa where I was born & lived for 29 years.
The bookmark really caught my eye & knew it would suit my daughter. She's only 7 and is a true lady & loves reading.
I printed the bookmark out, cut it & highlighted it with ultra fine glitter. I took a chance with laminating it BUT admitedly waited a day before laminating it. Phew....was I glad it never smudged :-)

On the back of the bookmark is one purple color butterfly at the top which I highlighted with glitter aswell. The poem I put on the back reads:
May the wings of the
butterfly kiss the sun
And find your shoulder
to light on.
To bring you luck,
happiness & riches
Today, tomorrow and beyond

Monday, January 23, 2012

Valentine's Day Card

My son (11) came home today & said mum...I need a Valentines Day Card please. Well, I looked at him totally shocked that he had a girlfriend at such a young age, but never said anything to him...after all I think I was at that age when I had my first boyfriend lol.

I asked him what he'd like & he said well, she's a typical girl that likes teddies, chocs and roses. That gave me an idea to use Forever Friends as we love their CD's. 


I decoupaged the Forever Friedns teddy & used ultra fine glitter on the roses. I mounted this onto red heart paper & glittered the single rose. I mounted all this onto gold mirri card then mounted that onto cream base card, along with the letters LOVE. Now, I just got to sit back & await a comment from my son but hope his girlfriend likes it :-)


Tuesday, December 13, 2011

Scalloped fairy xmas card


My husband bought me a Bigshot, but I only have a few embossing folders and no dies. Anyway, I saw this template in a magazine & tried my luck at it. I heat embossed the image onto round card that I had created using a compass and cut out with scissors. I then colored her with normal papermania colored pens. This was then mounted onto red mirri card, again made using a compass & cut out by hand. The small red & white card was a small plain round white card but I used a ruler to make the stripes. I highlighted the egde with glitter. This was then mounted onto red scalloped card & glittered the egde. The base card I made using a compass, cut it with scalloped scissors & edged in glitter. I finally mounted the image onto the main base card.

Victorian xmas card


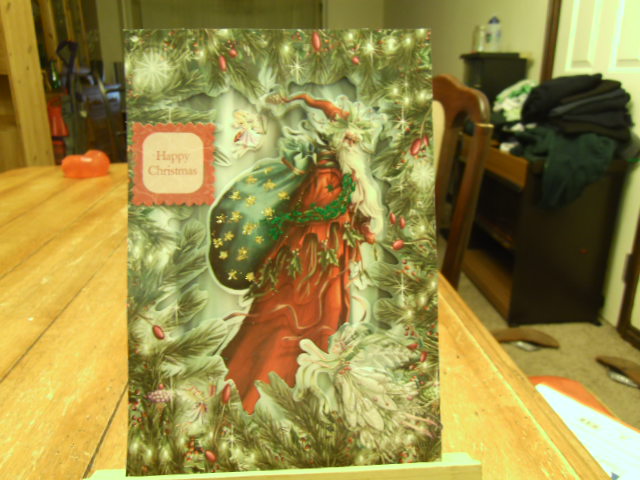
This card I made especially for one of the ladies I care for that has MS. It is decoupaged  and a bit of glitter added to some parts of it.

First waterfall card


I started to think I could make alot better cards than just the common card where you mount the images onto card. Well, I must say for my first ever waterfall card I think I did pretty good at it.

Xmas card my daughter made


Ok...I did all the cutting out of this card. My daughter stamped the image and used glitter to give it highlight. The sentiment I heat embossed for her. She punched out the snowflakes with my snowflake punch and she did the layout of the card. Not too bad for a 6 year old huh

First Decoupaged Card


This design I got from a magazine when I first started crafting & my very first attempt at decoupage. It is layered onto silver mirri card and the sentiment I threaded some ribbon through it.

Monday, December 12, 2011

Cute xmas card for a special lady


I couldn't resist doing this one for my favourite lady I care for. She loves dogs, but unfortunately due to bad illness she is not able to have any. Here, I have taken the image, wrapped a piece of ribbon near the bottom, finished with a small silver bow & gem stones on either end. The blue ribbon around the dog, bells and holly I have glittered. I cut the 3 edges into scallop. I then layered the whole image onto silver mirri card and put all this onto the base card.

Saturday, December 10, 2011

Fairy xmas card


I used a 10.5cm card base & embossed a snowflake design onto silver card using my bigshot. The colored paper I got from a magazine. The image I heat embossed, colored it with normal colored pens (papermania). The sentiment was from the same stamp set. I'm really pleased with how this card came out.